Over the course of this tutorial, I'll illustrate how to use MySQL to load, store, access, and sort SNP statistics computed by PLINK. To begin, you will need to download and install MySQL on your local machine, and you'll also need to install the MySQL GUI tools.
You can think of MySQL as a massive spreadsheet application like Excel - The basic unit within the database is a table, consisting of rows (sometimes called tuples) and columns (generally called fields). A collection of tables is called a schema (the plural form is schemata) - schemata are typically used for organizational purposes.
After installing MySQL Server and the MySQL GUI Tools, start the MySQL Query Browser. The Query Browser will prompt you for connection information - this information will depend on where you installed the MySQL Server application. Assuming that you installed the Server on your current computer, you would enter "localhost" as the host. Also, when installing MySQL Server, you were required to enter a password for the "root" account (which is the primary administrative account). Enter "root" as the username and the password you specified during setup.

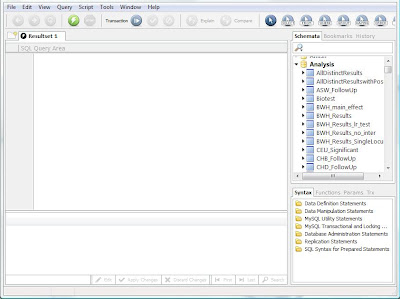
Now you should see the MySQL Query Browser, which has three main panes: the SQL query area, the schemata list, and the results pane. They schemata list is useful for browsing what the database contains, and allows you to see the field names and tables for each schema. The query editor allows you to enter and execute an SQL statement, and the results of that statement are returned in the results pane, which is essentially a read-only spreadsheet.
Lets start by creating a new schema to hold the tables we will make in this tutorial. In the Query Browser, type:
CREATE DATABASE Sandbox;Notice the semi-colon at the end of the statement - this tells the SQL engine that it has reached the end of an SQL statement. You can execute this statement two ways: 1. Hit Control-Enter, or 2. Click the button with the green lightning bolt. This statement just created a new schema in our database called Sandbox. You can see the new schema in the schemata browser if you right-click inside the schemata tab and choose refresh from the menu. The active schema in the MySQL Query Browser is always shown as bold. You can select a new active schema simply by double-clicking it in the schema browser.
Now let's create a table in the Sandbox schema. If you haven't already, double-click the Sandbox schema in the schemata browser to make it the active schema, then execute the following statement:
CREATE TABLE Tutorial (name varchar(30), address varchar(150), zipcode int);
This statement created a table called Tutorial in the Sandbox schema that has 3 fields: a character-based field with a max of 30 characters called "name", a character-based field with a max of 150 characters called "address", and an integer-based field called "zipcode".
Now let's load some data into this table. Most genetic analysis applications will output a text file with analysis results -- with this in mind, we'll create a text file containing several names, addresses, and zip codes to load into our new table:
Phillip J. Fry,Robot Arms Apartments #455,65774Copy and paste this text into a text file called "futurama_addresses.txt". Now execute the following statement:
Zapp Brannigan,Starship Nimbus Captain's Quarters,45542
Doctor Zoidberg,335 Medical Corporation Way,72552
Hubert J. Farnsworth,Planet Express Delivery Company,88754
LOAD DATA LOCAL INFILE "C:/futurama_addresses.txt" INTO TABLE Tutorial FIELDS TERMINATED BY ',' (name, address, zipcode);
The keyword LOCAL tells the MySQL browser to use files on the computer currently running the MySQL client (in this case the MySQL query browser) rather than the MySQL Server. The FIELDS TERMINATED BY ',' indicates that the file is comma-delimited. If the file were a tab-separated file, the statement would be FIELDS TERMINATED BY '\t'. The last portion inside parentheses tells the browser the order the fields appear in the text file, so if the zipcode were listed first in the text file, the statement would be (zipcode, name, address). Also, note the use of a forward-slash in the file location -- this is because MySQL designers use proper UNIX file locations rather than the heretic DOS-style format with a back-slash.
Now that the data is loaded, lets confirm that it is there and properly formatted in the database. Execute the following statement:
SELECT * FROM Tutorial;
This will return all rows from the Tutorial table to the results pane of the query browser. You should see all four rows and all three columns of our original text file, now neatly organized in our database.
In the next post, I'll show you how to do more sophisticated SELECT statements. Please comment if anything is unclear and I'll do my best to clarify.

