Pages

Showing posts with label Productivity. Show all posts

PLATO, an Alternative to PLINK

Since the near beginning of genome-wide association studies, the PLINK software package (developed by Shaun Purcell’s group at the Broad Institute and MGH) has been the standard for manipulating the large-scale data produced by these studies.  Over the course of its development, numerous features and options were added to enhance its capabilities, but it is best known for the core functionality of performing quality control and standard association tests. 

Nearly 10 years ago (around the time PLINK was just getting started), the CHGR Computational Genomics Core (CGC) at Vanderbilt University started work on a similar framework for implementing genotype QC and association tests.  This project, called PLATO, has stayed active primarily to provide functionality and control that (for one reason or another) is unavailable in PLINK.  We have found it especially useful for processing ADME and DMET panel data – it supports QC and association tests of multi-allelic variants.    

PLATO runs via command line interface, but accepts a batch file that allows users to specify an order of operations for QC filtering steps.  When running multiple QC steps in a single run of PLINK, the order of application is hard-coded and not well documented.  As a result, users wanting this level of control must run a sequence of PLINK commands, generating new data files at each step leading to longer compute times and disk usage.  PLATO also has a variety of data reformatting options for other genetic analysis programs, making it easy to run EIGENSTRAT, for example.

The detail of QC output from each of the filtering steps is much greater in PLATO, allowing output per group (founders only, parents only, etc), and giving more details on why samples fail sex checks, Hardy-Weinberg checks, and Mendelian inconsistencies to facilitate deeper investigation of these errors.  And with family data, disabling samples due to poor genotype quality retains pedigree information useful for phasing and transmission tests. Full documentation and download links can be found here (https://chgr.mc.vanderbilt.edu/plato).  Special thanks to Yuki Bradford in the CGC for her thoughts on this post.  

Copy Text to the Local Clipboard from a Remote SSH Session

This is an issue that has bugged me for years, and I've finally found a good solution on osxdaily and Stack Overflow. I'm using Terminal on my OSX laptop to connect to a headless Linux machine over SSH, and I want to copy the output from a command (on the remote server) to the local clipboard on my Mac using only the keyboard (i.e., a pipe). In essence:

commandThatMakesOutput | sendToLocalClipboard

If I'm working from the command line on my local machine, the pbcopy command does this for me. For example, while working on my local mac, if I wanted to copy all the filenames in the directory to my clipboard, I could use:

ls | pbcopy

To do this for output generated over SSH, the general solution works like this:

commandThatMakesOutput | ssh desktop pbcopy

When you're SSH'd into a remote host, this will take the output of commandThatMakesOutput and pipe it to the pbcopy command of the desktop machine that you ssh into from the remote host. In other words, you ssh back into your local machine from the remote host, passing output from commandThatMakesOutput back to pbcopy on your local machine.

There is one required step and three recommendations.

First, you must configure your local desktop as an SSH server. I'm assuming you're aware of any security risks you might be taking when doing this. Open system preferences, sharing. Enable remote login, preferably allowing only you to log in, for added security. You'll set up SSH keys later.

Here, take note of how to SSH into your machine. I've blurred out my IP address where it says "To log into this computer..." This brings up the first recommendation: you need a static IP address for this to work well, otherwise you'll have to constantly look up your IP address and modify the command you'll use to SSH back into your local machine from the remote host. Most institutions simply hand out static IPs if you ask nicely. 

The second recommendation is that you create an SSH key pair, storing the public key on your mac in ~/.ssh/authorized_keys and your private key on the remote host, so that you don't have to type a password. Make sure you chmod these files appropriately. I'll leave this up to you and Google.

Finally, you want to alias the command on your remote host to some quick command, like "cb". Preferably you'll add this to your .bashrc, so it's sourced every time you log in. E.g.

alias cb="ssh user@123.456.7.8 pbcopy"

So now, if you're logged into a remote host and you want to copy the output of pwd (on the remote host) to your local clipboard, you can simply use:

pwd | cb

I don't really know what this would do with anything other than small bits of ASCII text, so if you pipe binary, or the output of gzip -c to pbpaste, you're voiding your nonexistent warranty. Presumably there's a way to do this with Windows - I don't know of a command-line utility to give you access to the clipboard, but if you can think of a way how, please leave a comment.

New Year's Resolution: Learn How to Code

Farhad Manjoo at Slate has a good article on why you need to learn how to program. Chances are, if you're reading this post here you're already fairly adept at some form of programming. But if you're not, you should give it some serious thought.

Gina Trapani, former editor of tech blog Lifehacker, is quoted in the article:
“Learning to code demystifies tech in a way that empowers and enlightens. When you start coding you realize that every digital tool you have ever used involved lines of code just like the ones you're writing, and that if you want to make an existing app better, you can do just that with the same foreach and if-then statements every coder has ever used.”
Farhad makes the point that programming is important even in traditionally non-computational fields: if you were a travel agent in the 90's and knew how to code, not only would you have been able to see the approaching inevitable collapse of your profession, but perhaps you would have been able to get in early on the dot-com travel industry boom.

Q&A sites for biologists are littered with questions from researchers asking for non-technical, code-free ways of doing a particular analysis. Your friendly bioinformatics or computational biology neighbor can often point to a resource or design a solution that can get you 90% of the way, but usually won't grok the biological problem as truly as you do. By learning even the smallest bit of programming, you can at least be equipped with the knowledge of what is programmatically possible, and collaborations with your bioinformatician can be more fruitful. As every field of biological research becomes more computational in nature, learning how to code is becoming more important than ever.

Where to start

Getting started really isn't that difficult. Grab a good text editor like Notepad++ for windows, TextMate or Macvim for Mac, or vim for Linux/Unix. What language should you start with? This can be a subject of intense debate, but in reality, it doesn't matter - just pick something that's relevant to what you're doing. If you know Perl or Java, you can pick up the basics of Ruby or C++ in a weekend. I started with Perl (using the Llama book), but for scientific computing and basic scripting/automation, I would recommend learning Python instead. While Perl lets you get away with sloppy coding, terse shortcuts, with the motto of "there's more than one way to do it," Python forces you to keep your code tidy, and has a model that there's probably one best way to do something, and that's the way you should use. Python has a huge following in the scientific community - chances are you'll find plenty of useful functionality in the BioPython and SciPy modules. I learned Python in an afternoon through watching videos and doing exercises in Google's Python Class, and the free book Dive Into Python is a great reference. If you're on Windows, you can get Python from ActiveState; if you're on Mac or Linux, you already have Python.

The Slate article also points to Code Year - a site that will send you interactive coding projects once a week throughout 2012 starting January 9. Code Year is from the creators of Code Academy - a site with a series of fun, interactive JavaScript tutorials. Lifehacker has a 5-part "Night School" series on the basics of programming. Once you have some basic programming chops, take a look at Stanford's free machine learningartificial intelligence, and Natural Language Processing classes to hone your scientific computing skills. Need a challenge? Try the Python Challenge for fun puzzles to hone your Python skills, or check out Project Euler if you want to tackle more math-oriented programming challenges with any language. The point is - there is no lack of free resources to help you get started or get better at programming.

Slate - You Need to Learn How to Program

Sync Your Rprofile Across Multiple R Installations

Your Rprofile is a script that R executes every time you launch an R session. You can use it to automatically load packages, set your working directory, set options, define useful functions, and set up database connections, and run any other code you want every time you start R.

If you're using R in Linux, it's a hidden file in your home directory called ~/.Rprofile, and if you're on Windows, it's usually in the program files directory: C:\Program Files\R\R-2.12.2\library\base\R\Rprofile. I sync my Rprofile across several machines and operating systems by creating a separate script called called syncprofile.R and storing this in my Dropbox. Then, on each machine, I edit the real Rprofile to source the syncprofile.R script that resides in my Dropbox.

One of the disadvantages of doing this, however, is that all the functions you define and variables you create are sourced into the global environment (.GlobalEnv). This can clutter your workspace, and if you want to start clean using rm(list=ls(all=TRUE)), you'll have to re-source your syncprofile.R script every time.

It's easy to get around this problem. Rather than simply appending source(/path/to/dropbox/syncprofile.R) to the end of your actual Rprofile, first create a new environment, source that script into that new environment, and attach that new environment. So you'll add this to the end of your real Rprofile on each machine/installation:

my.env <- new.env()
sys.source("C:/Users/st/Dropbox/R/Rprofile.r", my.env)
attach(my.env)

All the functions and variables you've defined are now available but they no longer clutter up the global environment.

If you have code that you only want to run on specific machines, you can still put that into each installation's Rprofile rather than the syncprofile.R script that you sync using Dropbox. Here's what my syncprofile.R script looks like - feel free to take whatever looks useful to you.

RStudio: New free IDE for R


Just saw the announcement of the availability of Rstudio, a new (free & open source) integrated development environment for R that works on Windows, Mac, and Linux. Judging from the screenshots, it looks like Rstudio supports syntax highlighting for Sweave & easy PDF creation from Sweave code, which is something I haven't seen anywhere else (on Windows at least). It also has all the features you'd expect of any IDE: code syntax highlighting, code completion, an object and history browser, and a tabbed interface for editing R scripts. I've been happily using NppToR for some time now, and although it works well for me, it's no real IDE solution. I'll have to give this one a shot.

RStudio - an integrated development environment (IDE) for R

Results from Reference Management Poll

A while back I asked you what reference management software you used, and how well you liked it. I received 180 responses, and here's what you said.

Out of the choices on the poll, most of you used Mendeley (30%), followed by EndNote (23%) and Zotero (15%). Out of those of you who picked "other," it was mostly Papers or Qiqqa. There were even a few brave souls managing references caveman-style, manually.
 
As for how much you are satisfied with the software you used, there wasn't much variation. If anything, users of EndNote or RefMan ranked their satisfaction slightly lower on average, but my n here is starting to get a little low.


I've been using Mendeley for a few weeks now and like it so far as a replacement for RefMan. The MS Word integration works well, it can use all the EndNote formatting styles, and the online/social features are nice, even though I don't use them very often. Thanks for filling out the poll!

Sync your Zotero Library with Dropbox using WebDAV


About a year ago I wrote a post about Dropbox - a free, awesome, cross-platform utility that syncs files across multiple computers and securely backs up your files online. Dropbox is indispensable in my own workflow. I store all my R code, perl scripts, and working manuscripts in my Dropbox. You can also share folders on your computer with other Dropbox users, which makes coauthoring a paper and sharing manuscript files a trivial task. If you're not using it yet, start now.

I've also been using Zotero for some time now to manage my references. What's nice about Zotero over RefMan, EndNote and others, is that it runs inside Firefox, and when you're on a Pubmed or Journal website, you can save a reference and the PDF with a single click within your Zotero library. Zotero also interfaces with both MS Word and OO.o, and uses all the standard EndNote styles for formatting bibliographies.

You can also sync your Zotero library, including all your references, snapshots of the HTML version of all your articles, and all the PDFs using the Zotero servers. This syncs your library to every other computer you're using. This is nice when you're away from the office and need to look at a paper, but you're not on your institution's LAN and journal articles are paywalled. The problem with Zotero is a low storage limit - you only get tiny 100MB storage space for free. Have any more papers or references you want to sync and you have to pay for it.

That's if you use Zotero's servers. You can also sync your library using your own WebDAV server. Go into Zotero's preferences and you'll see this under the sync pane.

Here's where Dropbox comes in handy. You get 2GB for free when you sign up for Dropbox, and you can add tons more space by referring others, filling out surveys, viewing the help pages, etc. I've bumped my free account up to 19GB. Dropbox doesn't support WebDAV by itself, but a 3rd party service, DropDAV, allows you to do this. Just give DropDAV your Dropbox credentials, and you now have your own WebDAV server at https://dav.dropdav.com. Now simply point Zotero to sync with your own DropDAV server rather than Zotero's servers, and you can sync gigabytes of references and PDFs using your Dropbox.

Why not simply move the location of your Zotero library to a folder in your dropbox and forget syncing altogether? I did that for a while, but as long as Firefox is open, Zotero holds your library files open, which means they're not syncing properly. If you have instances of Firefox open on more than one machine you're going to run into trouble. Syncing to Dropbox with DropDAV only touches your Dropbox during a Zotero sync operation.

What you'll need:

1. Dropbox. Sign up for a free 2GB Dropbox account. If you use this special referral link, you'll get an extra 250MB for free. Create a folder in your Dropbox called "zotero."

2. DropDAV. Log in here with your Dropbox credentials and you'll have DropDAV up and running.

3. Firefox + Zotero. First, start using Firefox if you haven't already, then install the Zotero extension.

4. Connect Zotero to DropDAV. Go into Zotero's preferences, sync panel. See the screenshot above to set your Zotero library to sync to your Dropbox via WebDAV using DropDAV.

You're done! Now, go out and start saving/syncing gigabytes of papers!

Parallelize IBD estimation with PLINK

Obtaining the probability that zero, one, or two alleles are shared identical by descent (IBD) is useful for many reasons in a GWAS analysis. A while back I showed you how to visualize sample relatedness using R and ggplot2, which requires IBD estimates. Using plink --genome uses IBS and allele frequencies to infer IBD. While a recent article in Nature Reviews Genetics on IBD and IBS analysis demonstrates potentially superior approaches, PLINK's approach is definitely the easiest because of PLINK's superior data management capabilities. The problem with IBD inference is that while computation time is linear with respect to the number of SNPs, it's geometric (read: SLOW) with respect to the number of samples. With GWAS data on 10,000 samples, (10,000 choose 2) = 49,995,000 pairwise IBD estimates. This can take quite some time to calculate on a single processor.

A developer in Will's lab, Justin Giles, wrote a Perl script which utilizes one of PLINK's advanced features, --genome-lists, which takes two files as arguments. You can read about this feature under the advanced hint section of the PLINK documentation of IBS clustering. Each of these files contain lists of family IDs and individual IDs of samples for whom you'd like to calculate IBD. In other words, you can break up the IBD calculations by groups of samples, instead of requiring a single process to do it all. The Perl script also takes the base filename of your binary pedfile and parses the .fam file to split up the list of individuals into small chunks. The size of these chunks are specified by the user. Assuming you have access to a high-performance computing cluster using Torque/PBS for scheduling and job submission, the script also writes out PBS files that can be used to submit each of the segments to a node on a supercomputing cluster (although this can easily be modified to fit other parallelization frameworks, so modify the script as necessary). The script also needs all the minor allele frequencies (which can easily be attained with the --freq option in PLINK).

One of the first things the script does is parses and splits up your fam file into chunks of N individuals (where N is set by the user - I used 100 and estimation only took ~15 minutes). This can be accomplished by a simple gawk command:

gawk '{print $1,$2}' data.fam | split -d -a 3 -l 100 - tmp.list

Then the script sets up some PBS scripts (like shell scripts) to run PLINK commands:


At which point you'll have the output files...

data.sub.1.1.genome
data.sub.1.2.genome
data.sub.1.3.genome
data.sub.1.4.genome
data.sub.2.2.genome
data.sub.2.3.genome
data.sub.2.4.genome
data.sub.3.3.genome
data.sub.3.4.genome
data.sub.4.4.genome


...that you can easily concatenate.

Here's the perl script below. To run it, give it the full path to your binary pedfile, the number of individuals in each "chunk" to infer IBD between, and the fully qualified path to your .frq file that you get from running plink --freq. If you're not using PBS to submit jobs, you'll have to modify the code a little bit in the main print statement in the middle. If you're not running this in your /scratch/username/ibd directory, you'll want to change that on line 57. You'll also want to change your email address on line 38 if you want to receive emails from your scheduler if you use PBS.


After you submit all these jobs, you can very easily run these commands to concatenate the results and clean up the temporary files:

cat data.sub.*genome > results.genome
rm tmp.list*
rm data.sub.*

Install and load R package "Rcmdr" to quickly install lots of other packages

I recently reformatted my laptop and needed to reinstall R and all the packages that I regularly use. In a previous post I covered R Commander, a nice GUI for R that includes a decent data editor and menus for graphics and basic statistical analysis. Since Rcmdr depends on many other packages, installing and loading Rcmdr like this...

install.packages("Rcmdr", dependencies=TRUE)
library(Rcmdr)

...will also install and load nearly every other package you've ever needed to use (except ggplot2, Hmisc, and rms/design). This saved me a lot of time trying to remember which packages I normally use and installing them one at a time. Specifically, installing and loading Rcmdr will install the following packages from CRAN: fBasics, bitops, ellipse, mix, tweedie, gtools, gdata, caTools, Ecdat, scatterplot3d, ape, flexmix, gee, mclust, rmeta, statmod, cubature, kinship, gam, MCMCpack, tripack, akima, logspline, gplots, maxLik, miscTools, VGAM, sem, mlbench, randomForest, SparseM, kernlab, HSAUR, Formula, ineq, mlogit, np, plm, pscl, quantreg, ROCR, sampleSelection, systemfit, truncreg, urca, oz, fUtilities, fEcofin, RUnit, quadprog, mlmRev, MEMSS, coda, party, ipred, modeltools, e1071, vcd, AER, chron, DAAG, fCalendar, fSeries, fts, its, timeDate, timeSeries, tis, tseries, xts, foreach, DBI, RSQLite, mvtnorm, lme4, robustbase, mboost, coin, xtable, sandwich, zoo, strucchange, dynlm, biglm, rgl, relimp, multcomp, lmtest, leaps, effects, aplpack, abind, RODBC.

Anyone else have a solution for batch-installing packages you use on a new machine or fresh R installation? Leave it in the comments!

Embed R Code with Syntax Highlighting on your Blog

Note 2010-11-17: there's more than one way to do this. See the updated post from 2010-11-17.

If you use blogger or even wordpress you've probably found that it's complicated to post code snippets with spacing preserved and syntax highlighting (especially for R code). I've discovered a few workarounds that involve hacking the blogger HTML template and linking to someone else's javascript templates, but it isn't pretty and I'm relying on someone else to perpetually host and maintain the necessary javascript. Github Gists make this really easy. Github is a source code hosting and collaborative/social coding website, and gist.github.com makes it very easy to post, share, and embed code snippets with syntax highlighting for almost any language you can think of.

Here's an example of some R code I posted a few weeks ago on making QQ plots of p-values using R base graphics.


The Perl highlighter also works well. Here's some code I posted recently to help clean up PLINK output:


Simply head over to gist.github.com and paste in your code, select a language for syntax highlighting, and hit "Create Public Gist." The embed button will give you a line of HTML that you can paste into your blog to embed the code directly.

Finally, if you're using Wordpress you can get the Github Gist plugin for Wordpress to get things done even faster. A big tip of the had to economist J.D. Long (blogger at Cerebral Mastication) for pointing this out to me.

Using R, LaTeX, and Sweave for Reproducible Research: Handouts, Templates, & Other Resources

Several readers emailed me or left a comment on my previous announcement of Frank Harrell's workshop on using Sweave for reproducible research asking if we could record the seminar. Unfortunately we couldn't record audio or video, but take a look at the Sweave/Latex page on the Biostatistics Dept Wiki. Here you can find Frank's slideshow from today and the handout from today (a PDF statistical report with all the LaTeX/R code necessary to produce it). While this was more of an advanced Sweave/LaTeX workshop, you can also find an introduction to LaTeX and an introduction to reproducible research using R, LaTeX, and Sweave, both by Theresa Scott.

In addition to lots of other helpful tips, you'll also find the following resources to help you learn to use both Sweave and LaTeX:

Keep your lab notebook in a private blog

In my previous post about Q10 a commenter suggested a software called "The Journal" by davidRM for productively keeping track of experiments, datasets, projects, etc. I've never tried this software before, but about a year ago I ditched my pen and paper lab notebook for an electronic lab notebook in the form of a blog using Blogger, the same platform I use to write Getting Genetics Done.

The idea of using a blogging platform for your lab notebook is pretty simple and the advantages are numerous. All your entries are automatically dated appear chronologically. You can view your notebook or make new entries from anywhere in the world. You can copy and paste useful code snippets, upload images and documents, and take advantages of tags and search features present with most blogging platforms. I keep my lab notebook private - search engines can't index it, and I have to give someone permission to view before they can see it. Once you've allowed someone to view your blog/notebook, you can also allow them to comment on posts. This is a great way for my mentor to keep track of result and make suggestions. And I can't count how many times I've gone back to an older notebook entry to view the code that I used to do something quickly in R or PLINK but didn't bother to save anywhere else.

Of course Blogger isn't the only platform that can do this, although it's free and one of the easiest to get set up, especially if you already have a Google account. Wordpress is very similar, and has tons of themes. You can find lots of comparisons between the two online.  If you have your own web host, you can install the open-source version of Wordpress on your own host, for added security and access control (see this explanation of the differences between Wordpress.com and Wordpress.org).

Another note-taking platform I've been using recently is Evernote. Lifehacker blog has a great overview of Evernote's features.  It runs as a desktop application, and it syncs across all your computers, and online in a web interface also. The free account lets you sync 40MB a month, which is roughly the equivalent of 20,000 typed notes. This quota resets every month, and you start fresh at 40MB. You can also attach PDFs to a note, and link notes to URLs. Every note is full-text searchable.

And then of course there's the non-free option: Microsoft OneNote.  Although it will set you back a few bucks, it integrates very nicely with many features on your Windows machine. I've never used OneNote.

Using MySQL to Store and Organize Results from Genetic Analyses

This is the first in a series of posts on how to use MySQL with genetic data analysis. MySQL is a very popular, freely available database management system that is easily installed on desktop computers (or Linux servers). The "SQL" in MySQL stands for Structured Query Language, which is by my humble estimation the most standardized way to store and access information in the known universe. SQL is an easy language to learn, and is fundamentally based on set operations such as unions and intersects.

Over the course of this tutorial, I'll illustrate how to use MySQL to load, store, access, and sort SNP statistics computed by PLINK. To begin, you will need to download and install MySQL on your local machine, and you'll also need to install the MySQL GUI tools.

You can think of MySQL as a massive spreadsheet application like Excel - The basic unit within the database is a table, consisting of rows (sometimes called tuples) and columns (generally called fields). A collection of tables is called a schema (the plural form is schemata) - schemata are typically used for organizational purposes.

After installing MySQL Server and the MySQL GUI Tools, start the MySQL Query Browser. The Query Browser will prompt you for connection information - this information will depend on where you installed the MySQL Server application. Assuming that you installed the Server on your current computer, you would enter "localhost" as the host. Also, when installing MySQL Server, you were required to enter a password for the "root" account (which is the primary administrative account). Enter "root" as the username and the password you specified during setup.


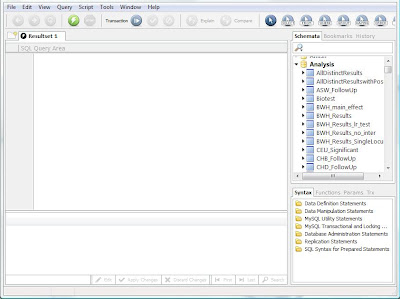
Now you should see the MySQL Query Browser, which has three main panes: the SQL query area, the schemata list, and the results pane. They schemata list is useful for browsing what the database contains, and allows you to see the field names and tables for each schema. The query editor allows you to enter and execute an SQL statement, and the results of that statement are returned in the results pane, which is essentially a read-only spreadsheet.

Lets start by creating a new schema to hold the tables we will make in this tutorial. In the Query Browser, type:

CREATE DATABASE Sandbox;
Notice the semi-colon at the end of the statement - this tells the SQL engine that it has reached the end of an SQL statement. You can execute this statement two ways: 1. Hit Control-Enter, or 2. Click the button with the green lightning bolt. This statement just created a new schema in our database called Sandbox. You can see the new schema in the schemata browser if you right-click inside the schemata tab and choose refresh from the menu. The active schema in the MySQL Query Browser is always shown as bold. You can select a new active schema simply by double-clicking it in the schema browser.

Now let's create a table in the Sandbox schema. If you haven't already, double-click the Sandbox schema in the schemata browser to make it the active schema, then execute the following statement:
CREATE TABLE Tutorial (name varchar(30), address varchar(150), zipcode int);

This statement created a table called Tutorial in the Sandbox schema that has 3 fields: a character-based field with a max of 30 characters called "name", a character-based field with a max of 150 characters called "address", and an integer-based field called "zipcode".

Now let's load some data into this table. Most genetic analysis applications will output a text file with analysis results -- with this in mind, we'll create a text file containing several names, addresses, and zip codes to load into our new table:

Phillip J. Fry,Robot Arms Apartments #455,65774
Zapp Brannigan,Starship Nimbus Captain's Quarters,45542
Doctor Zoidberg,335 Medical Corporation Way,72552
Hubert J. Farnsworth,Planet Express Delivery Company,88754
Copy and paste this text into a text file called "futurama_addresses.txt". Now execute the following statement:

LOAD DATA LOCAL INFILE "C:/futurama_addresses.txt" INTO TABLE Tutorial FIELDS TERMINATED BY ',' (name, address, zipcode);

The keyword LOCAL tells the MySQL browser to use files on the computer currently running the MySQL client (in this case the MySQL query browser) rather than the MySQL Server. The FIELDS TERMINATED BY ',' indicates that the file is comma-delimited. If the file were a tab-separated file, the statement would be FIELDS TERMINATED BY '\t'. The last portion inside parentheses tells the browser the order the fields appear in the text file, so if the zipcode were listed first in the text file, the statement would be (zipcode, name, address). Also, note the use of a forward-slash in the file location -- this is because MySQL designers use proper UNIX file locations rather than the heretic DOS-style format with a back-slash.

Now that the data is loaded, lets confirm that it is there and properly formatted in the database. Execute the following statement:

SELECT * FROM Tutorial;

This will return all rows from the Tutorial table to the results pane of the query browser. You should see all four rows and all three columns of our original text file, now neatly organized in our database.

In the next post, I'll show you how to do more sophisticated SELECT statements. Please comment if anything is unclear and I'll do my best to clarify.

Sync files across multiple computers with Dropbox (PC, Mac & Linux too!)

Do you ever find yourself switching back and forth between your work computer, your laptop, and your home computer?  This happens to me all the time when I'm writing.  Rather than carry all your files on a USB stick and risk losing it or corrupting your data, give Dropbox a try.  It's dead simple, and works for PC, Mac, and Linux too.

Once you sign up and install on all your computers, you'll have a special folder, where if you save something there on one computer, it is automatically created and stays synchronized in the same folder on all your other computers.  What's more, if you use someone else's computer, you can access all your files through a web interface because they're all securely backed up online.  I've been using this for a while now to sync all the papers I'm working on, RefMan/EndNote databases, config files, and R functions I reuse all the time.  You can also create "public" folders.  Put something here, and you can get a direct link to the file online to share with other folks. For example, here's a link to some R code I wrote to use ggplot2 to make manhattan plots and QQ-plots for every PLINK output file in the current directory (I'm hoping to clean this code up and include this with some other functions I've written into a package on CRAN soon).

I can't recommend this little app enough. If you're still not convinced, check out this short video that explains what Dropbox is all about and shows of just how simple it is to use.

You get a whopping 2GB for free, but if you use the registration link provided below, you'll get an extra free 1/4GB.  Happy holidays from GGD, and I'll catch up with you all next week!

Dropbox - Secure online backup and synchronization

Use Doodle to Schedule Meetings

Today I was trying to schedule a committee meeting for the middle of February.  Scheduling via email can be a nightmare, especially with those who have a demanding schedule.  I suspect most folks around the CHGR have seen this before, but for those who haven't, check out Doodle.  It's the fastest and easiest way I know of to schedule meetings.  You don't need to sign up, and you don't even need to give them your email address.  Just pick some days and times when you could hold the meeting and it gives you a link you can send out.  Meeting participants check a box when they are available, then you can quickly see when's a good time to schedule.  Click to see the screenshot below.


Doodle: easy scheduling

Get the full path to a file in Linux / Unix

In the last post I showed you how to point to a file in windows and get the full path copied to your clipboard.  I wanted to come up with something similar for a Linux environment.  This is helpful on Vampire/ACCRE because you have to fully qualify the path to every file you use when you submit jobs with PBS scripts. So I wrote a little perl script:

#!/usr/bin/perl
chomp($pwd=`pwd`);
print "$pwd\n" if @ARGV==0;
foreach (@ARGV) {print "$pwd/$_\n";}

You can copy this from me, just put it in your bin directory, like this:

cp /home/turnersd/bin/path ~/bin

Make it executable, like this:

chmod +x ~/bin/path

Here it is in action. Let's say I wanted to print out the full path to all the .txt files in the current directory.  Call the program with arguments as the files you want to print the path to:


[turnersd@vmps21 replicated]$ ls
parseitnow.pbs
parsing_program.pl
replic.txt
tophits.txt
 
[turnersd@vmps21 replicated]$ path *.txt
/projects/HDL/epistasis/replicated/replic.txt
/projects/HDL/epistasis/replicated/tophits.txt


Sure, it's only a little bit quicker than typing pwd, copying that, then spelling out the filenames.  But if you have long filenames or lots of filenames you want to copy, this should get things done faster.  Enjoy.

Use plain text when you need to just write

When you need to focus and get some serious writing done, it may be a good idea to ditch your word processor and go with plain text instead. Save all your formatting and spell-checking to do later in one step. I just tried this out on a review article I needed to write and found it much easier to concentrate without all of MS Word's squiggly underlining, autocorrecting, autoformatting, and fancy toolbar buttons begging to be clicked. If you're using windows, Notepad works fine, but try out a tiny free program called Q10. It's a full screen text editor that by default uses easy-on-the-eyes light text on a black background. You can also run it directly from a USB stick. When you're done, just open the .txt file using Word, and from there out save it as .doc. By default it comes enabled with some silly typewriter sound when you type, but it's easy enough to turn that off.

Q10 - Full screen distraction-free text editor

Ditch Excel for AWK!

How often have you needed to extract a certain column from a file, or strip out only a few individuals from a ped file? This is often done with Excel, but that requires loading the data, manipulating it, then saving it back into a format that is acceptable, which may require converting tabs to spaces or other aggravating things. In many circumstances, a powerful linux command, AWK, can be used to accomplish the same thing with far fewer steps (at least once you get the hang of it).

AWK is almost like its own language, and in fact portions of PERL are based on AWK. Let's say you have a file called text.txt and you want to find all lines of that file that contain the word "the":

> awk '/The/' text.txt

Or you'd like to see all lines that start with "rs":

> awk '/^rs/' text.txt

Or perhaps most usefully, you want to strip the top 5 lines out of a file:

> awk 'NR > 5' text.txt

This just scratches the surface of course... for a good tutorial with examples, check out this site:
http://www.vectorsite.net/tsawk_1.html#m2

I'll also look into setting up a post with AWK snippets for common useful procedures...

Will

Write Your First Perl Script

And it will do way more than display "Hello, world!" to the screen. An anonymous commenter on one of our Linux posts recently asked how to write scripts that will automate the same analysis on multiple files. While there are potentially several ways to do this, perl will almost always get the job done. Here I'll pose a situation you may run into where perl may help, and we'll break down what this simple perl script does, line by line.

Let's say you want to run something like plink or MDR, or any other program that you have to call at the command line with a configuration or batch file that contains the details of the analysis. For this simple case, let's pretend we're running MDR on a dataset we've stratified 3 ways by race. We have three MDR config files: afr-am.cfg, caucsian.cfg, and hispanic.cfg that will each run MDR on the respective dataset. Now, we could manually run MDR three separate times, and in fact, in this scenario that may be easier. But when you need to run dozens, or maybe hundreds of analyses, you'll need a way to automate things. Check out this perl script, and I'll explain what it's doing below. Fire up something like nano or pico, copy/paste this, and save the file as "runMDR.pl"

foreach $current_cfg (@ARGV)
{
# This will run sMDR
`./sMDR $current_cfg`;
}
# Hooray, we're done!

Now, if you call this script from the command line like this, giving the config files you want to run as arguments to the script, it will run sMDR on all three datasets, one after the other:

> perl runMDR.pl afr-am.cfg caucasian.cfg hispanic.cfg

You could also use the askerisk to pass everything that ends with ".cfg" as an argument to the script:

> perl runMDR.pl *.cfg

Okay, let's break this down, step by step.
  1. First, some syntax. Perl ignores everything on a line after the # sign, so this way you can comment your code, so you can remember what it does later. The little ` things on the 4th line are backticks. Those are usually above your tab key on your keyboard. And that semicolon is important.
  2. @ARGV is an array that contains the arguments that you pass to the program (the MDR config files here), and $current_config is a variable that assumes each element in @ARGV, one at a time.
  3. Each time $current_config assumes a new identity, perl will execute the code between the curly braces. So the first time, perl will execute `./sMDR afr-am.cfg`; The stuff between the backticks is executed exactly as if you were typing it into the shell yourself. Here, I'm assuming you have sMDR and afr-am.cfg in the current directory.
  4. Once perl executes the block of code between the braces for each element of @ARGV, it quits, and now you'll have results for all three analyses.
A few final thoughts... If the stuff you're automating is going to take a while to complete, you may consider checking out Greg's previous tutorial on screen. Next, if whatever program you're running over and over again displays output to the screen, you'll have to add an extra line to see that output yourself, or write that output to a file. Also, don't forget your comments! Perl can be quick to write but difficult to understand later on, so comment your scripts well. Finally, if you need more help and you can't find it here or here, many of the folks on this hall have used perl for some time, so ask around!

Start using RSS in 5 minutes

RSS rocks. In addition to consolidating all the news you read on a single page, it's also handy for keeping up with the latest publications in your favorite journals without ever going to PubMed. If you're not using RSS, give it a shot and you'll never look back.

RSS stands for Really Simple Syndication. You might also hear it called "syndication", "news aggregation", "news feeds", or simply a "feed." Nowadays, nearly every blog, news, or other website that continually updates content uses RSS and allows users to subscribe to those feeds, and that includes most scientific journals. CNN, Nature Genetics, PNAS, Getting Genetics Done, ESPN, and even Barack Obama's blog all broadcast RSS. An RSS reader will aggregate updates or headlines from your favorite websites as they are posted into a single page, and usually lets you read the first paragraph or so of the article. You can then click to link out to the full article and continue reading if you're interested. It's a great way to aggregate all the news or blog content you read on a daily basis into a single web page for quick viewing.

To start using RSS, you'll need a reader. A great one to start with is google reader. They have a one-minute long video to show you the basic features. It's web-based so you don't have to install anything. All you need is a Gmail account, which most people already have nowadays.

Now let's subscribe to a few posts. Go to the NY Times' Science page. If you're using firefox, you should see the shiny orange RSS symbol in the address bar. Internet Explorer and Chrome have similar functionality built-in. Click it, then click add to Google Reader. Let's add a subscription to Nature Genetics. Click on their "Web Feeds" link near the right hand side of the front page. If websites don't have a page dedicated to the feeds they offer, many times your browser will realize that the content is syndicated with RSS, and you can subscribe using your browser. Now go back and check out your google reader page. It's easier to skim through headlines if you click the "Show: List" view rather than the expanded view. Click "Mark all as read" when you're done scanning through headlines. Any new stories published on either of these websites will show up here as a new item.